Clip-In Guide
Unlike other types of hair extensions, wearing clip-in hair extensions does not require any expert skills or the assistance of a specialist. You can quickly and easily achieve the desired look by yourself, even if you are a novice in the world of clip-in hair extensions, just by following a few simple steps.
Once this technique is mastered, Cheeky Chica® clip-in hair extensions should only take about 5 - 10 minutes to apply. Just a clip away and you are ready to rock an instantly long, thick… irresistible hair!

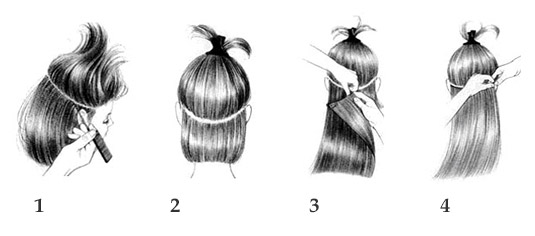
1. Clip-in hair extensions should be attached from the bottom up. Using a rat tail comb or your index fingers, create a parting from the right to the left at the lowest point on the hairline.
2. Section off the hair above the parting and clip it out of the way.
3. Starting with one of the 6" wide 3-clip wefts, measure the weft against the parting to check if it fits perfectly - the weft should be wide enough to sit along the back of your hairline. Snap all clips open and begin attaching the weft just below the parting. By locating the middle of the nape, place the middle clip first, catch your hair and snap it shut.
4. Holding the middle clip in place with your left hand, use your right hand to position the right edge of the weft around your head, catch your hair in the right clip and snap it shut.

5. Repeat Step 3 and attach the left clip onto your hair using your left hand and snap it shut. Check there are no gaps or bumps along the weft - it should lie completely flat onto the surface of your head.
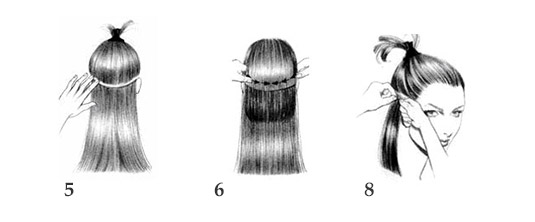
6. To place the remaining wefts, release all the hair that was clipped out of the way in Step 1 and make another parting right above the weft that was just attached. Again, section off and clip the remaining hair away.
7. Repeat the same procedure, as described in Step 2 through 5 to insert the remaining wefts.
8. The two 4" wide 2-clip wefts should be attached on each side of your head - one on the left and one on the right. Starting with the clip at the further edge of the weft, find a suitable spot on your head, where the weft would not interfere with another weft, catch your hair in the clip and snap it shut. Avoid attaching wefts onto each other to minimise hair damage or shedding.
9. While holding the weft at the outermost clip to keep it in place, the innermost clip that is closer to the hairline should then be positioned, so that it is approximately 2 cm away from the hairline. Catch your hair in the clip and snap it shut.
10. Finally, the two 1" wide 1-clip wefts should be attached right above the 4" wide 2-clip wefts on each side of your hairline - one on the left and one on the right. Alternatively, you are also able to attach them at any spot around your head to fill in any gaps or to add extra volume.
Optional:
11. To prevent fine hair from slipping away, you are able to tease gently your own hair at the roots using a teasing comb and some hair spray to create more texture in your hair. Teasing hair extensions is not recommended.
12. If you have shorter layers at the crown of your head, you are able to backcomb your topmost layers above the weft to create more volume and ensure the clips are completely hidden underneath.
13. Styling your own hair and the hair extensions together, while wearing them, would help tremendously in ensuring that the hair extensions are beautifully and seamlessly blended with your natural hair. Always brush the hair extensions thoroughly before styling to remove any knots or tangles in the hair.
Enjoy experimenting with your look with
Cheeky Chica® hair extensions!
